外贸站中,contact form 7是一个很有用的插件,方便客户直接留言,提升客户体验度。
Wordpress网站使用Contact Form 7 作为联系表单, 发送邮件的时候可能会遇到错误: Failed to send your message. Please try later or contact the administrator by another method., 一般是由于服务器不支持发送邮件, 可以通过安装Postfix解决. 与使用SMTP插件或sendmail相比, Postfix发送效率更高, 速度更快, 配置也要比sendmail简单得多.
一个完整的邮件服务器一般需要安装cyrus-sasl、postfix、dovecot、postfixadmin、roundcubemail等软件, 不过我们的目的只是通过contact form 7 发送表单接收询盘, 所以只装postfix就好.
Postfix简介:
(转自百度百科) Postfix是Wietse Venema在IBM的GPL协议之下开发的MTA(邮件传输代理)软件。postfix是Wietse Venema想要为使用最广泛的sendmail提供替代品的一个尝试。在Internet世界中,大部分的电子邮件都是通过sendmail来投递的,大约有100万用户使用sendmail,每天投递上亿封邮件。这真是一个让人吃惊的数字。Postfix试图更快、更容易管理、更安全,同时还与sendmail保持足够的兼容性。
搭建在LNMP幻境下的. 本文以下环境基于Linode, Centos 7, LNMP
下面是安装教程:
1. 如果之前装有sendmail, 先卸载掉
Xshell连上服务器.
运行命令:
yum remove -y sendmail
2. 安装 Postfix
yum install postfix -y
3. 更改默认MTA为Postfix
/usr/sbin/alternatives --set mta /usr/sbin/sendmail.postfix
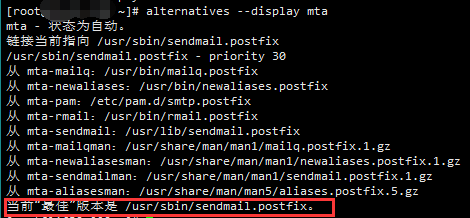
4. 检查下是否将MTA改为Postfix
alternatives --display mta
5. 配置Postfix
编辑Postfix配置文件main.cf
vim /etc/postfix/main.cf
建议通过FTP把文件下载到本地, 修改完成后再上传覆盖.
完整代码如下:
smtpd_sender_restrictions = permit_mynetworks, check_sender_access hash:/etc/postfix/sender_access, permit
smtpd_recipient_restrictions = permit_mynetworks, check_recipient_access hash:/etc/postfix/recipient_access, reject
queue_directory = /var/spool/postfix
command_directory = /usr/sbin
daemon_directory = /usr/libexec/postfix
data_directory = /var/lib/postfix
mail_owner = postfix
myhostname = li781-311.members.linode.com
mydomain = wmsoho.com
myorigin = $mydomain
inet_interfaces = all
inet_interfaces = localhost
inet_protocols = ipv4
mydestination = $myhostname, localhost.$mydomain, localhost, $mydomain
unknown_local_recipient_reject_code = 550
mynetworks_style = host
relay_domains = $mydomain
alias_maps = hash:/etc/aliases
alias_database = hash:/etc/aliases
canonical_maps = hash:/etc/postfix/canonical
debug_peer_level = 2
debugger_command =
     PATH=/bin:/usr/bin:/usr/local/bin:/usr/X11R6/bin
     ddd $daemon_directory/$process_name $process_id & sleep 5
sendmail_path = /usr/sbin/sendmail.postfix
newaliases_path = /usr/bin/newaliases.postfix
mailq_path = /usr/bin/mailq.postfix
setgid_group = postdrop
html_directory = no
manpage_directory = /usr/share/man
sample_directory = /usr/share/doc/postfix-2.10.1/samples
readme_directory = /usr/share/doc/postfix-2.10.1/README_FILES
几点要注意的:
- myhostname: Linode主机的去这里找,其他的主机名可以通过探针看。
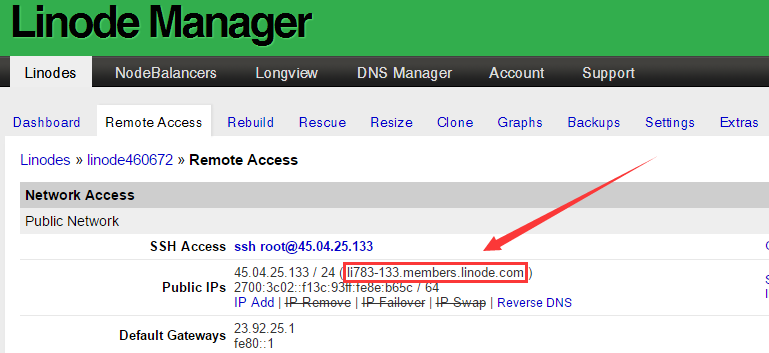
或者在Xshell中运行hostname查看.
– mydomain: 把后面的域名改成你自己的.
其他基本不用动.
6. 修改默认发件人www为自定义邮箱
默认的邮件发件人是www@域名.com, 可以改成admin或者info之类的.
编辑canonical文件
vim /etc/postfix/canonical
在任意位置添加代码: www admin@wmsoho.com, 然后保存.
进入目录/etc/postfix/
cd /etc/postfix/
运行命令
postmap canonical
7. 修改PHP配置文件的邮件发送路径
编辑PHP配置文件php.ini
vim /usr/local/php/etc/php.ini
把;sendmail_path =改成sendmail_path = /usr/sbin/sendmail -t -i
8. 最后重启postfix、lnmp并将postfix加入开机启动
lnmp restart
service postfix restart
chkconfig postfix on
安装完毕
打开网站发送表单, 测试一下发送是否正常, 发送速度是否变快(实测不到1秒即发送成功~), 以及是否能成功收到邮件.
